Failure: Topping up!

Today the first wine failure: Topping up. What is it? Why? How?

Years ago I started making wine. I had no idea how, but I bought some demijohns and other equipment. To make it easy I decided to start with some kit wines. (Actually that was the first mistake.) They come with everything you need, and a manual.

Making the wine was not difficult and very interesting. I enjoyed it. Fermentation started and finished. I racked it and made my first mistake: I did not fill the demijohn but I left a lot of empty space above the wine.

Empty? No. It is filled with wine’s worst enemy! Air!

Or to be more specific: Oxygen. Oxygen reacts with wine and it causes off tastes and flavors.

In small quantities Oxygen is not a problem and actually improves (red) wine when it ages, but this was not the case.

When the wine is fermenting it is no problem to have empty space because the CO2 that is formed is heavier than air and forms a protective blanket above the wine. Thinking about this image gives me a warm, save feeling.

But we were already passed this stage. I had no idea that I was damaging the wine and I racked it again and still another time. Destroying the blanket and each time the wine was supplied with fresh Oxygen. Which sounds nice if you are human, but is killing the wine.

I used Sulphite to protect it but it was not going to help against my ignorance.

After 6 months or so I bottled the wine and it did not taste well. There was something wrong. I read the manual and finally found out what “Topping up” means. Very simple; fill the demijohn.

So, what should I have done? Well there are several options:

  • Buy some wine which is similar to your wine and add it to the demijohn until the bottom of the neck. In case you need to top up just a small amount you can also use water.
  • Transfer the wine to smaller demijohns. I have several sizes so I can always find a reasonable combination. The last liters you can store in normal bottles which you can use to top up when you rack again.
  • Something I read but never tried: Top up the demijohn with glass marbles. Tilt the demijohn so the marbles do not break it when they fall on the bottom. Or put them in cheese cloth which you can lower slowly in the demijohn with a piece of string. And of course the marbles should be sterilized. Again: I never tried this.

At the moment I have changed my racking strategy a bit. Actually a lot. Many people have the idea that you should rack quite often. Some say even every 2 months. I disagree with that.

I rack from a fermentation bucket to a demijohn when the fermentation is almost finished, after a few months when the wine is practically clear, and once more one day before bottling. I try to rack only a few times to have as little contact with air as possible. I will come back to this in another story in the failure series.

Hans

Posted in Şarap | Yorumlar Kapalı

Success! I found another way that does not work!

Failures are a great way to learn. Usually people will not write down their failures but only their successes. If we continue like this we will all make the same mistakes until the end of time.

Therefore I decided to describe the path of failures that I walked to get where I am today. I will also include stories from others because I did not make all the mistakes there are.

I am not sure whether I should write about my failures because they are actually important to me. I have forgotten about a lot of successes but the failures I remember vividly. And I can laugh about most of them. Especially the biggest ones. I remember the kitchen floor was flooded with boiling beer. My God. At the moment I felt awful about it but now I…. I..

I still hate that moment.

Anyway, I am sure that there are plenty of mistakes left for you to make.

Since I made more than a few failures I cannot write all of them at once so this story will be a living document.

Topping up

Shards bring luck!

Racking can lead to foggy results

How to make white Stilton yellow

Failures in cheese can be magnificent. This attempt to make mozzarella resulted in a much better cheese than I aimed for. Since I did not reach my goal I call it a failure but I consider it a great achievement. The tastiest rubber ball

Why is my cheese not coagulating?

Not really my failure but fermentation stopped?

Oops, Did I add bottling sugar?

Hans

Posted in Bira, Genel, Peynir, Şarap | Yorumlar Kapalı

Those who forget history are doomed to repeat it

“What did I do?”

You will not remember unless you write it down. Winemakers, cheesemakers and beer makers all need to keep track of what they are doing because you will not remember.

For beer makers and cheesemakers it is a little less important because the ingredients are more constant. Milk is milk. Malt is malt. This is a bit crude but the point is that apples are NOT apples!

Meaning that apples are different at every location and every harvest. The amount of sugar will vary, as well as the amount and type of acid. It is not possible to have a standard recipe for apple wine that will always work. Therefore you will need to make a recipe, each time adjusting some parameters.

An unfortunate thing about making wine is that it takes a long time before it is finished. That is why you have to keep track of what you did. In the past I bought logbooks to keep track. And I am glad that I did. I was able to learn from the wines that I made and tried to improve by changing ingredients or amounts.

I also was able to see some mistakes which are very obvious to me now.

So I made a template for a wine logbook. You can use it to write down for example the ingredients, special dates, specific gravity, alcohol %, etc.

You can also use it to write down what you think of the finished wine. Do not drink all your wine at once but try to spread it out over 1 or 2 years. It is very interesting to see how it develops.

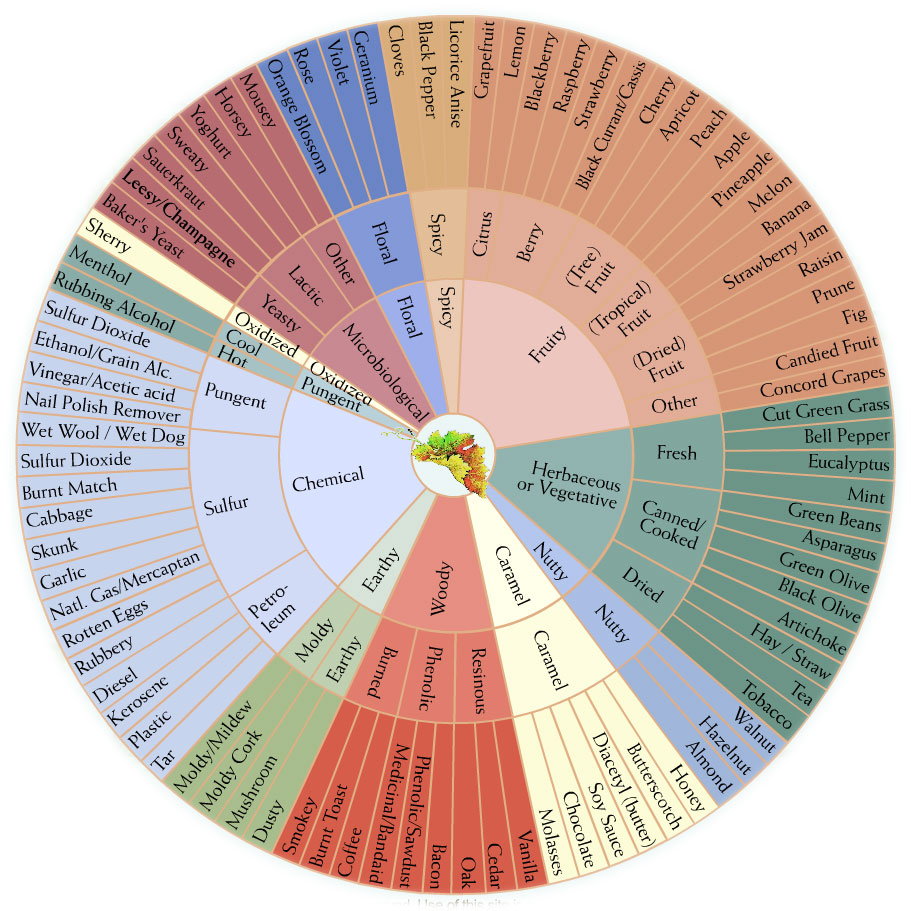
I always have trouble to describe flavors or tastes. I can’t find the right words. The wine drinker world has created a useful tool for this. The aroma wheel. Just write down some words that you think apply to your wine. As you can see the wine world has found a lot of weird words to describe wine.

Funny detail: Grapes are not on the wheel. Apparently wine is more likely to taste like plastic than grapes.

Hans

Posted in Şarap | Yorumlar Kapalı

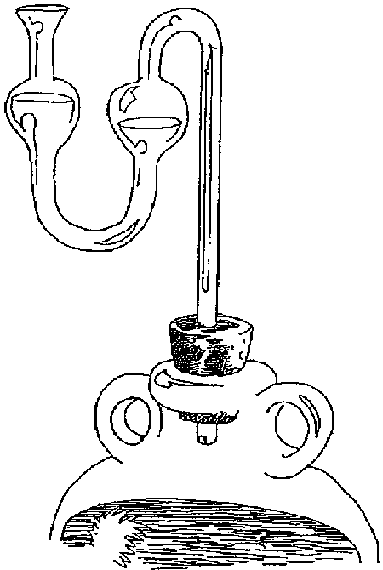
Don’t let your airlock fool you!

Believe it or not: I even have something to say about something as simple as the airlock!

As beer or wine maker you cannot do without some kind of airlock. It has several functions:

  • It keeps out air which can damage your wine or beer
  • The CO2 developed during fermentation can go out of the demijohn via the airlock. The “empty” space of the fermenter or demijohn will be filled with CO2 because it is heavier than air. This layer of CO2 protects the wine or beer from oxygen in air.
  • It keeps out bugs. Fruit flies love wine but can carry a bacteria which converts wine to vinegar.
  • It keeps out wild yeasts or bacteria. Especially when you fill the airlock with a solution with sulphite and some citric acid or wodka.

The airlock is used often as indication that the fermentation has stopped or not. But beware! There are some traps!

  • There could be a small leak. In this case you don’t see any movement in the air lock. Obviously this does not mean that fermentation has stopped! When the water in both sides of the airlock are at the same level you should be especially suspicious.
    Since the airlock consists of 2 halves which are glued together the surface can be uneven at the seam. You can scrape off the uneven parts with a knife or scissors.
  • After some time you see the airlock bubbling again even though you are sure that fermentation has stopped. Possibly you have a spontaneous malolactic fermentation, but more likely it is caused by the weather; When the demijohn warms up the CO2 above the wine or beer will expand and push against the water in the air lock. Or there may be a low pressure front. This also causes the CO2 in the bottle to expand and cause a movement in the air lock. In the same way the airlock may work in the opposite direction, sucking in air from the outside world.

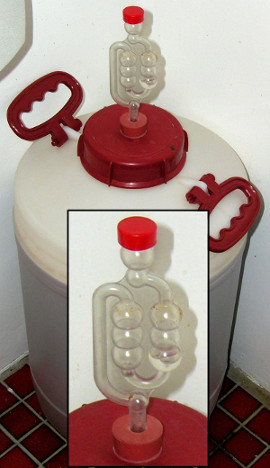
There are several types available. I tried 2 and ended up with the classic model. The downside of this air lock is that it is not easy to clean once it has gotten dirty inside. The other air lock I had consists of 2 parts making it much easier to clean. This air lock is also available in bigger sizes and can be used for bigger quantities.

However, I prefer the classic model. You can see the level of the water and the movement of the bubbles. It takes a very long time for water to evaporate. And, most important, it makes a very relaxing bubbling sound.

This is different for the other model that I used. It is not so easy to see whether there is still water in it. It has happened to me several times that the air lock was dry. Therefore I decided to stop using it.

If you are making bigger quantities and need a bigger air lock it is very easy to make one. I will post about this another time.

Hans

Posted in Bira, Şarap | Yorumlar Kapalı

Measuring acidity

Since there is plenty to say about this subject I am sure that I will write something in a later stage again. But for now I want to start with the basics.
In wine making acidity is usually measured in gram tartaric acid per liter. So if you say: The acidity of this wine is 7, it means that in 1 liter wine there is an amount of different acids as if it was 7 gram of tartaric acid.
Citric acid and malic acid are stronger than tartaric acid so you need less of them to reach the same acidity.

To be exact:
You only need 0,9 gram of malic acid to increase the acidity with 1.
And you only need 0,85 gram citric acid to increase the acidity with 1.

Normal values for acidity would be 4 or 5 for a red wine, and 6 to 8 for a white wine but a little higher or lower is also no problem. Since yeast also eats a little acid during fermentation it is again not a very exact science.

As you have seen in the story about the specific gravity table for wine it is also nice to know the acidity because it helps to predict how much sugar is available.

How the test works:

The most that you want to measure is acidic. The opposite of acid is a base. In the middle you end up with a neutral fluid.
So you take a sample of the acidic most. You add a base to it and when it becomes neutral you see that the color of the fluid changes.
With the test kit you can see exactly how much base you added and this tells you how much acid there was in your sample.

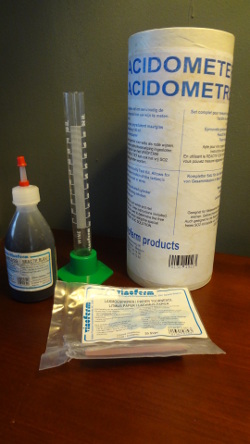
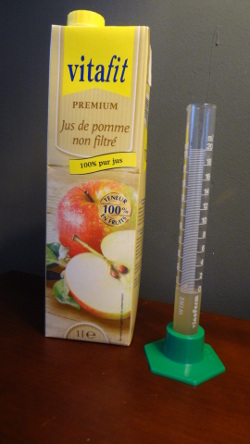
This is the set: A glass tube with a scale, some litmus papers, and a blue indicator (the base). Of course there are also instructions included but naturally men don’t need them.

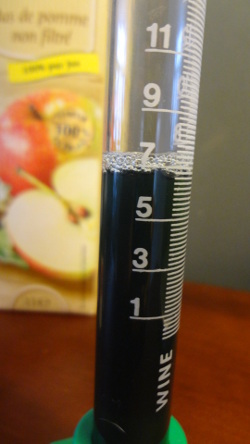
Let’s measure the acidity of this apple juice.


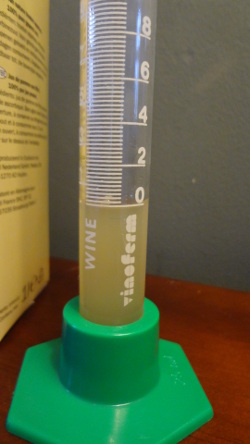
Fill the tube with the juice up to the 0 level. This should be done rather precise.

Add the blue indicator until the color changes.

I assume that this will be around 6 or 7 so I add the indicator immediately up to 4. After that I increase in steps of 1.

Mix the blue indicator with the juice by shaking the tube. Try not to create foam.

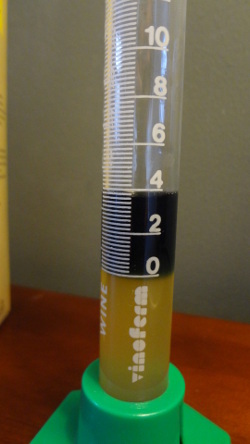
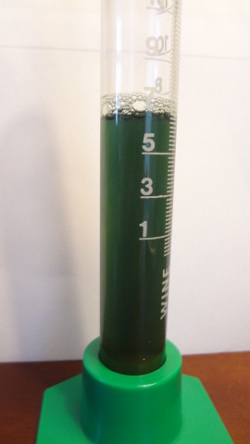
At 7 the color has definitely changed. On the first picture it looks blue which means that I added too much base.

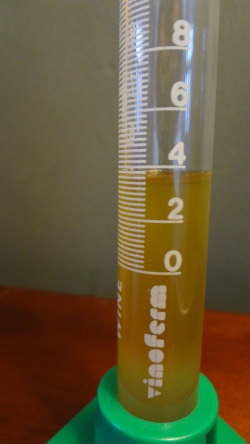
However if you look at the sample with a white background it is dark green. That’s more or less ok. I would say that the acidity is somewhere between 6 and 7. I could do the test again to be more precise but as a hobby wine maker I would accept the result 6.5.

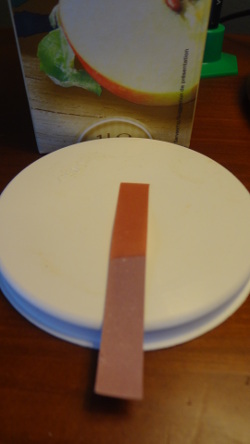
With the litmus papers you can check it. Dip the paper in the sample. If the color turns to orange (as in the picture) you have to add more blue indicator. If the color turns blue you added too much. And if the color does not change it is ok. I almost never do this check.

And that is it. A very simple and cheap way to determine the acidity.

Some notes:

  • The blue indicator is poisonous and should not be consumed. After the test you must throw away the sample.
  • The juice used in this test is very light. It is not too difficult to see the change in color. For dark juices it gets more difficult and in some cases it is almost impossible to see the change. There are some tricks that help (a bit) which I will explain in other stories.
  • I would suggest to practice a few times before you really need to do a measurement.
  • In the instructions it is mentioned that CO2 influences the measurement. I did not understand it at first because CO2 is not an acid. However, CO2 + water can form H2CO3. This is an acid. Normally the amount will not be a problem but I guess that it can be a big influence if you want to measure a fermenting juice.
  • The strength of the blue indicator decreases in time but if it is not opened frequently you can use it for a long time. I store mine in the refrigerator. I don’t know if it matters but cold and dark always seems to help if you want to store things for a longer period of time.

Hans

Posted in Şarap | Yorumlar Kapalı

Specific Gravity table for wine

What is the point of measuring the Specific Gravity? The goal is to determine and correct the amount of alcohol you will have in the finished wine.

  • Measure the acidity of your juice.
  • Measure the S.G. with the hydrometer.
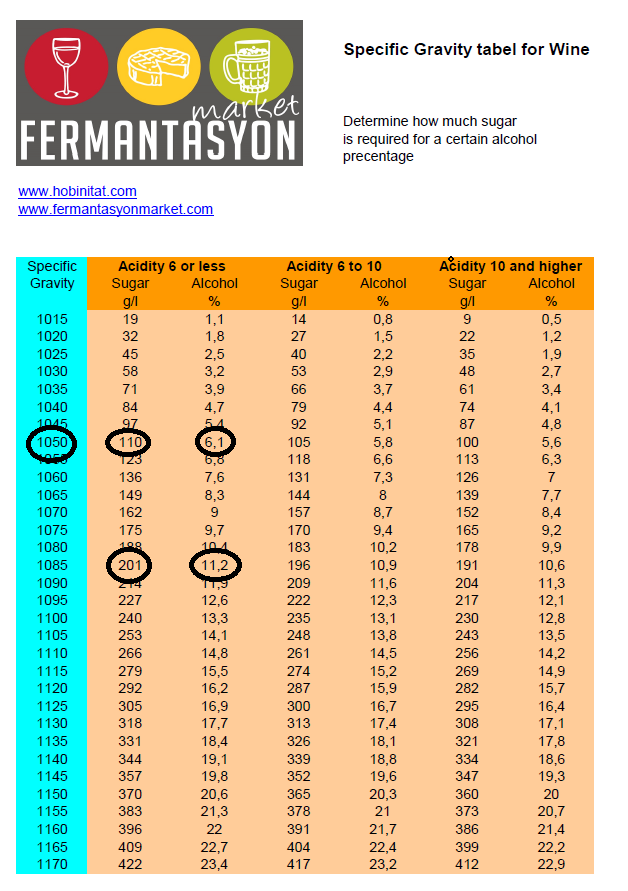
  • Check the corresponding column in the table according to the acidity to find out the alcohol percentage and amount of sugar. If you don’t know the acidity you can use the middle column. (6 to 10 g/l acid) It is not such a big difference to the others.
  • In case you want more alcohol; look up the amount of sugar that you need for this percentage and compare it to the amount of sugar available in the juice.
  • Determine the amount of sugar per liter you need to increase the S.G. to the desired value and add it.

A simple example.

You want to make 10 liter wine of approximately 11 %.

Let’s say that the acidity of your juice is 5.

The hydrometer measurement is 1050.

In the table (see below) you can see that there is 110 gram sugar in 1 liter and the result would be an alcohol % of 6,1.

In the table you can see that you need 201 gram of sugar per liter for 11,2 % alcohol.

So you need to add 201-110 = 91 gram per liter.

Put 10×91=910 gram of sugar in the fermenter and fill it to 10 liter.

Note: Do not fill the fermenter to 10 liter and then add the sugar. This is not completely correct because the sugar also has volume and you will end up with more than 10 liter.

Some things about the table that you don’t really need to know but may be interesting:

I copied it from a book that I have, and another wine maker that I know also has used it for years.

Since you can make wine from a lot of different fruits the table is a compromise. I guess you could make a similar table for every fruit there is, but probably they would also be different every year.

Because acids influence the S.G., the table is divided in three parts.

The table is based on the following formula’s:

Juice with acidity lower than 6:
sugar (g/l) = 2,6 x (SG-1000) – 20

Juice with acidity between 6 and 10:
sugar (g/l) = 2,6 x (SG-1000) – 25

Juice with acidity higher than 10:
sugar (g/l) = 2,6 x (SG-1000) – 30

Cheers

Hans

Posted in Şarap | Leave a comment

Specific Gravity table for beer

The point of measuring the Specific Gravity is to determine and correct the amount of alcohol you will have in the finished beer.

I think beer is a bit more difficult than wine because you are not able to predict the S.G. after fermentation very well. (In wine it is always practically 0 if you let fermentation finish) Since it is not exact science you will have to estimate this.

  • Measure the S.G. with the hydrometer.
  • Check the corresponding column in the table according to the estimated SG after fermentation to find out the alcohol percentage and amount of sugar.
  • In case you want more alcohol; look up the amount of sugar that you need for this percentage and compare it to the amount of sugar available in the wort.
  • Determine the amount of sugar per liter you need to increase the S.G. to the desired value and add it.

Yes, let’s do an example.

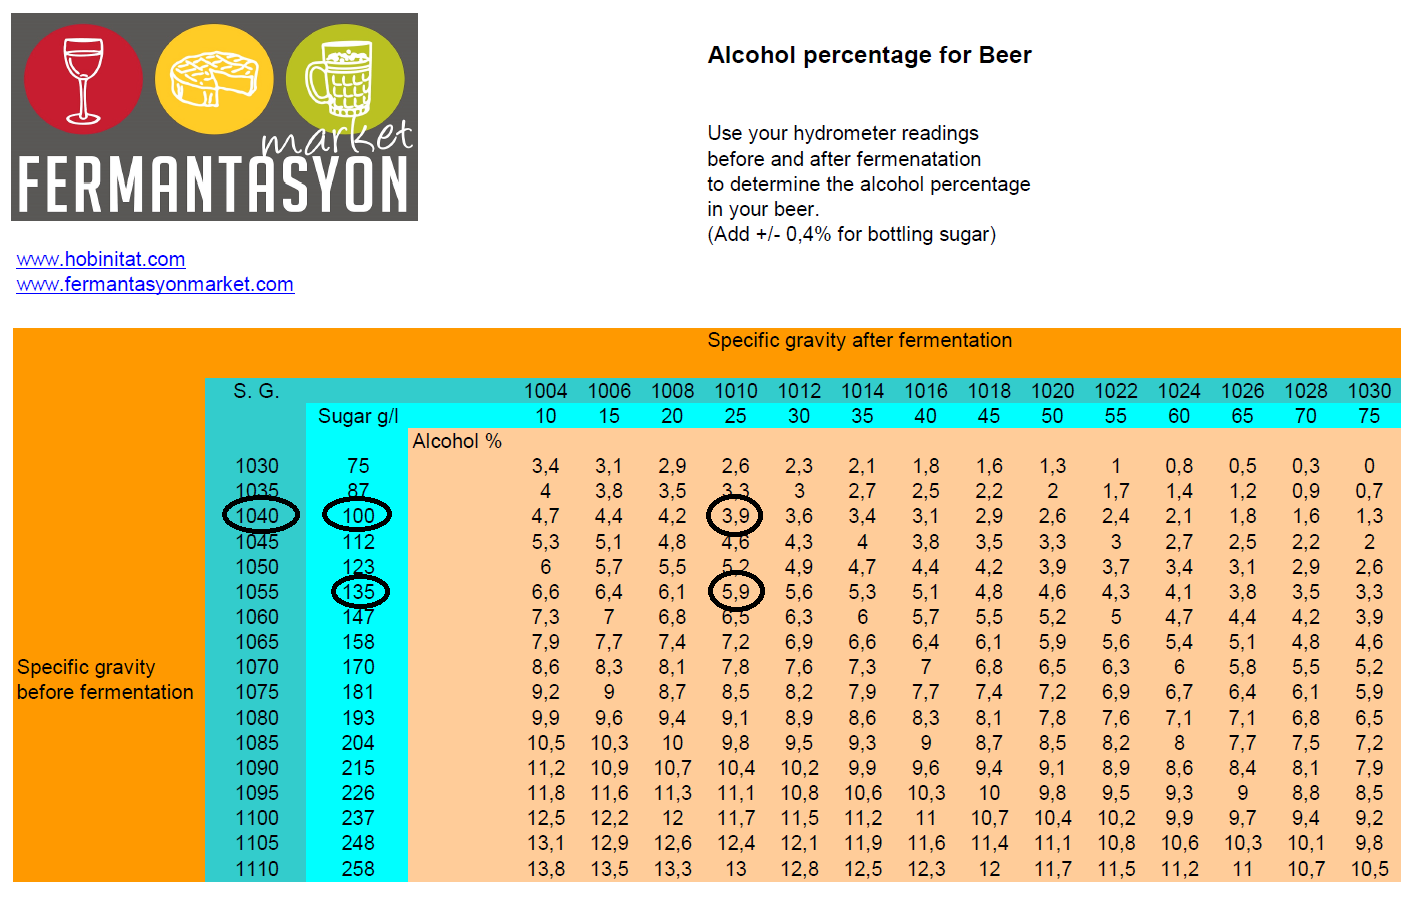
You want to make 10 liter beer with 6% alcohol. You expect that the specific gravity after fermentation will be 1010.

The hydrometer measurement before fermentation is 1040.

In the table (see below) you can see that there is 100 gram per liter sugar and that the alcohol percentage after fermentation will be 3,9%.

This is obviously very little. Maybe something went wrong. In the table you can see that you need 135 gram per liter to reach 5,9% alcohol.

So you need to add 135 – 100= 35 gram per liter. So in total you need to add 350 gram sugar to your wort.

In case you want to know how much alcohol your beer contains and how much sugar is left, you have to make a measurement after the fermentation as well.

  • Measure the S.G. again. Please note that this measurement will be influenced by the alcohol so it will be a little bit lower than expected.
  • In case the S.G. is lower than you expected there is more alcohol in the beer and less residual sugar. Case closed.
  • In case the S.G. is higher than you expected, there is less alcohol and more sugar that the yeast could not eat. In this case you can decide to add some more sugar to start a new fermentation and create more alcohol. You can use the table to determine how much sugar should be left and how much sugar is actually left and add the difference.
    Be very sure that fermentation has stopped otherwise you will get a very alcoholic beer!
  • In case the S.G. is much higher than you expected the fermentation is either not finished (Wait for 10 days) or stuck! (You have a problem)

Let’s continue with the example.

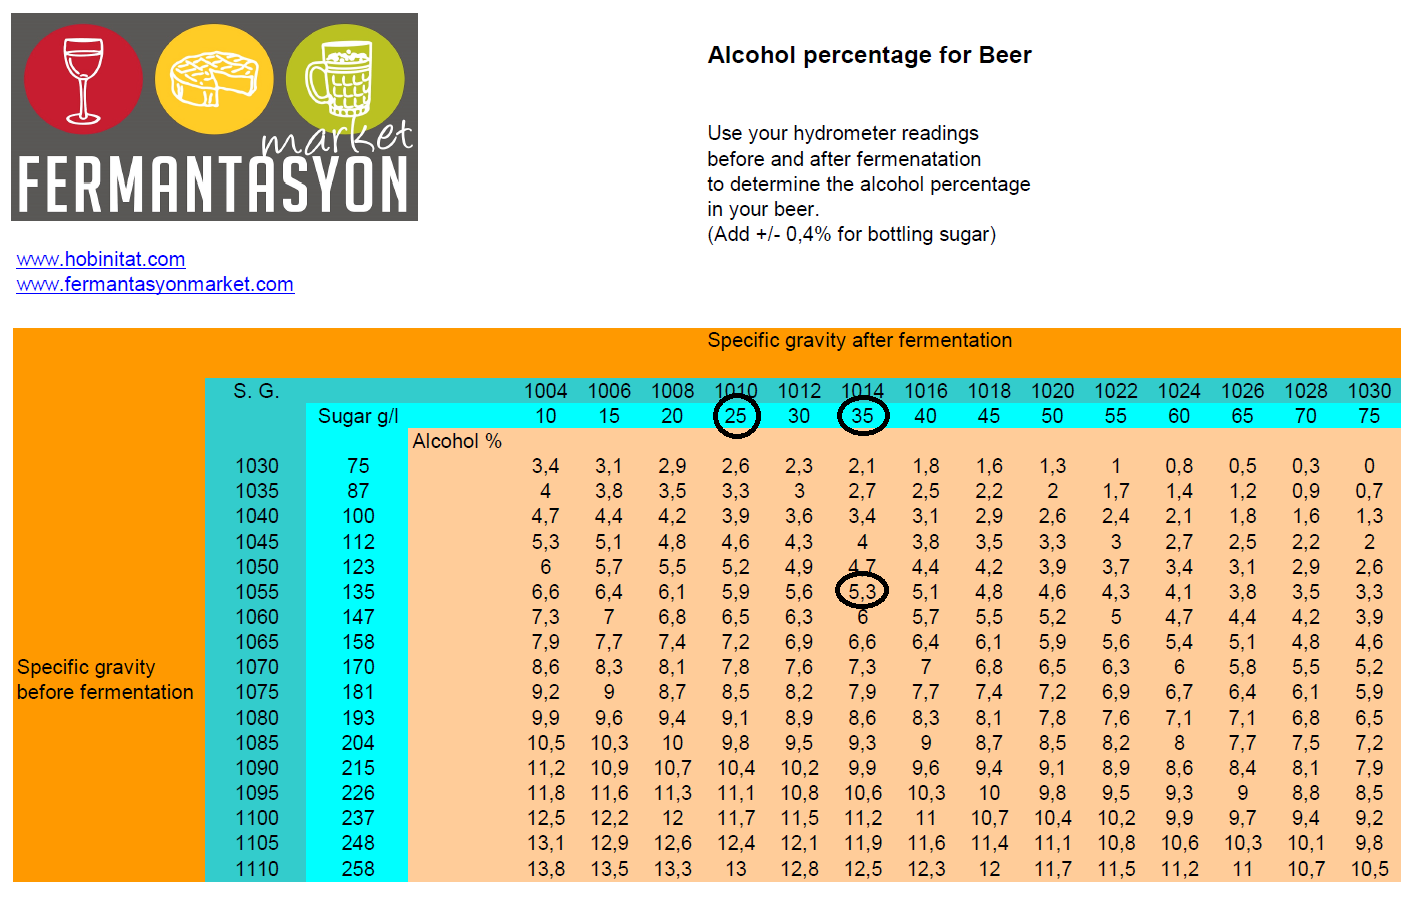
The fermentation is finished and you make another SG measurement. It turns out to be 1014 instead of 1010. You can decide to wait for 10 days to see if the SG will decrease or, if you are very sure that fermentation has finished you can decide to add some more sugar.

In the table you can see that your beer has 5,3% alcohol and that there is 35 grams of sugar left per liter.

So, if you want to get an alcohol percentage of 5,9 % you need to add 35 – 25 = 10 gram sugar per liter (So 100 gram in total) and wait for this to be fermented before you can bottle.

Some things about the table that you don’t really need to know:

I have not found a book that describes the formulas that define the table. For some reason the books that I have, do not make the link between S.G. and amount of sugar. (Or Plato or Brix values)

The table is made by me by combining a table that is in one of my books and some other information that I found on the internet.

Cheers

Hans

Posted in Bira, Şarap | Yorumlar Kapalı

The Hydrometer

This simple tool is essential for wine makers and beer makers. It measures the so called “Specific gravity”. To put it another way; it measures the weight of a liquid compared to water.

This number by itself does not mean anything for a wine or beer maker but with tables or formula’s you can say something about the amount of sugar in the liquid.

However a big ATTENTION here. Sugar is very heavy and it is of great influence on the specific gravity. Usually other influences can be more or less discarded. But keep in mind what you are doing. You are NOT measuring sugar contents, you are measuring “weight”.

I found that out when I was measuring a juice that I bought from a supermarket. On the box it mentioned that there should be 110 gram sugar per liter in it. When I measured it the hydrometer reading was around 1037 which means, according to the table that I use, only around 80 gram sugar per liter!

I did not understand what was happening because I did not believe that the manufacturer could be wrong by this much.

Luckily I also have a refractometer (which measures sugar in a completely different way) so I also measured the juice with it. The refractometer said that the package was correct with its 110 gm/l.

Then I noticed something on the package. The keyword was carbonated! There was CO2 dissolved in the juice. Since CO2 is much lighter, the specific gravity of the juice was much lower than expected.

So be aware that other factors (like alcohol) can influence the SG.

Another point that is worth mentioning is that there can be more scales on the hydrometer. It can also have a scale for potential alcohol and / or sugar contents. Do not use these! The hydrometer can be used for beer making and wine making and you can imagine that these liquids have a different amount of sugar in them at the same SG.

So use the value for SG and use a table or a software program to determine the sugar and alcohol amounts.

Now that we have that out of the way; let’s measure something!

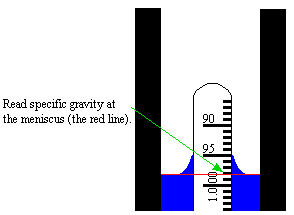
It is very simple. Just put some of the juice in the measuring cylinder and put in the hydrometer.

Read the value as shown in the drawing.

Check in the table what the amount of sugar is and how much alcohol will be produced. In case you want more alcohol you can use the table to find out how much sugar to add.

Please note that the tables for wine and beer are different!

How do you use the tables? Find out in the following stories: Wine table and Beer table.

Some notes:

  • As always: Work cleanly.
  • The meter should not be stuck to the wall of the cylinder
  • Make sure that there are no air bubbles stuck to the hydrometer.
  • In case you are making wine from fruit; make sure there is no pulp in the cylinder
Posted in Bira, Şarap | Yorumlar Kapalı

How easy is making wine?

Well it is much easier than you might think. Ten years ago I would never have thought that it is possible to make wine yourself. That was a mistake. It is really easy and you don’t need a lot of materials. If you are a beer maker you have almost everything already and most of these steps are familiar to you.

I will try to write a general procedure for making wine and explain the steps and equipment in other stories.

First you need to decide what kind of wine you want to make; Do you have fresh fruit available or do you want to make it from store bought juices?

  • If you have fresh fruit you are limited by the fruit. It is not possible to make red wine from apples.
  • Serious wine makers will curse, but it is very easy to make pretty good wine from juices from the supermarket. And you have much more choices the whole year.

Once you have decided on the fruit there are some other choices;

  • How much alcohol do you think is appropriate for your wine? White wines have less alcohol than red wines in general.
  • How much acid do you want to use? White wines have a little more acid than red wines in general.
  • Do you want a wine with a lot of body or a lighter wine? White wines have less body in general.
  • Do you want to add tannin to your wine? In white wines I think it usually should not be used but in red wines it can give some nice detail to it. Definitely do not use too much.
  • Do you want a taste of wood or something else?

Ok. Let’s begin.

Let’s say you want to make 10 liters of a very basic apple wine from supermarket juice, with 11% alcohol, and acidity of 6 gm/l.

  • You can make this wine from cheap apple juice made from concentrate but if you don’t mind spending a little more you can also try to find fresh apple juice. Check on the package that there are no preservatives in the juice.
  • Measure the specific gravity with a hydrometer. If you don’t have one you can check on the package how much sugar is in the juice. This could be around 110 gm/l.
    To make a wine with 11% alcohol you need approximately 200 gm/l of sugar. So per liter you need to add 90 gm.
  • If you have an acid test set you can measure how much acid is in the juice. Measure it and make a note. Let’s say the test says 4 gm/l.
    To make the acidity 6 gm/l you need to add 2 gm/l acid. I would suggest citric acid for this wine.

Let’s make wine!

  • Work clean! Sterilize all your equipment, and your hands with a sulphite solution.
  • Add 900 gm sugar and 20 gm acid to a fermenting bucket.
  • Fill the bucket up to 10 liter with the apple juice.
  • Stir until the sugar is dissolved.
  • Add the yeast to a small glass of water. Use a good yeast. It can make or break your wine.
  • After 15 minutes add the yeast to the bucket.
  • Close the lid of the bucket and place the airlock.
  • Write down what you did! If you make a great wine you need your notes to create it again. Trust me; you will not remember later!

That’s it! You are making wine! Or better; your yeast is converting the sugar into alcohol.

  • The airlock should start bubbling in a few hours and some foam will form.
  • When the first stage is over and there are not so many bubbles coming out of the airlock I rack the future wine in a demijohn, leaving most of the lees in the bucket. In this stage you don’t want air touching the wine so the demijohn should be filled up to the neck!
  • Leave the wine to clear. This can take a long time. Some wines will never be completely clear.
  • Have patience. Months of patience.
  • When you think it is ready, rack the wine in the fermenting bucket or another demijohn with a little dissolved sulphite. Try not to disturb the lees in the demijohn.
  • Rack the wine in bottles and seal them with a cork or a crown cap.

And you are finished. You have wine in bottles. Wait for a few weeks before you open them because they might suffer from something called bottle shock.

Believe it or not but it can be this simple and you will be surprised about the wines you will produce. And another big advantage of using juices from a supermarket is that you can make wine throughout the year. You will learn much quicker than somebody who can make wine only when he has fruit.

This short story describes how to make wine but I left out a lot of small things that I also would like to explain. I will do that in other stories using this one as a general guide line.

Cheers

Hans

Posted in Bira, Şarap | Yorumlar Kapalı

pH continued

In the previous story about pH I used tap water to see how much Citric acid I would need to change the pH to a level suitable for beer. I realized that there is not much point to this story if you don’t know what the pH of your water is. Well, to all the people who do not have a pH meter I have some good news: After reading this you will not need one!

Of course you can forget about all of this if you do not care too much about the details. You will still make beer if the pH of the water is not perfect. If you don’t get enough sugar out of your malt just add some sugar afterwards. No problem.

But I can tell from my own experience that the pH does influence the efficiency of the enzymes, resulting in more sugar.

Time for a new experiment.

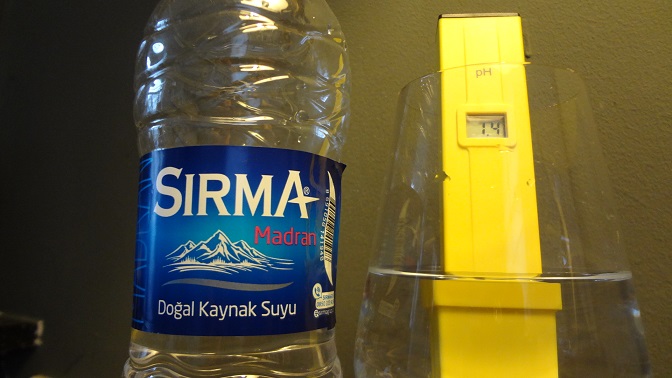
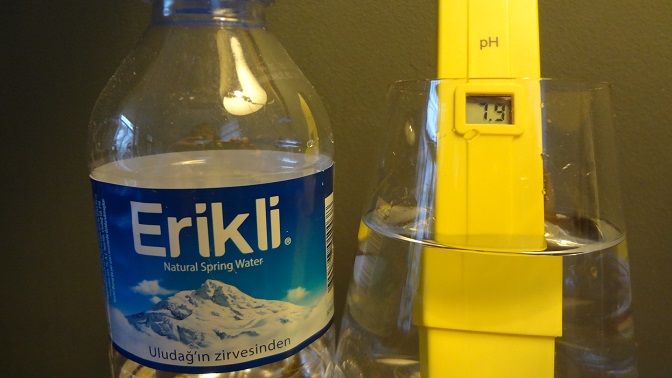
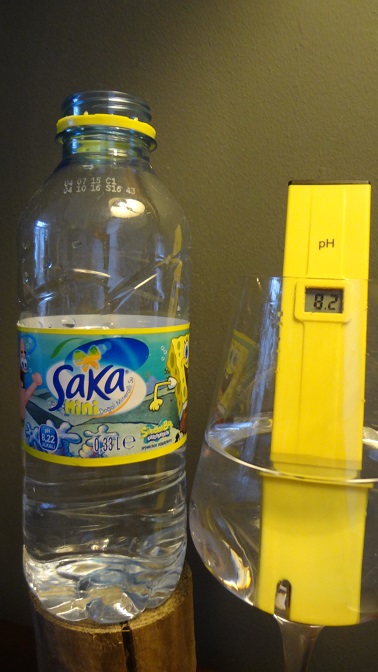
I got some Turkish waters and measured the pH of these waters. Here are the results:

Sirma 7,4, Erikli 7,9, and Saka mini 8,2

Let’s say that water in general will have a pH between 7 and 8. The pH should be a bit lower for beer making (Between 5,2 and 5,6) so a little acid should be added.

As I wrote before I do not have the acids that beer makers generally use but I have citric acid. Since the quantities are extremely small it will not influence the taste of the beer.

I bought a more accurate scale so I could do measurements a lot more accurate than last time.

The test was as follows:

  • I weighed 10 gm of Citric acid
  • I dissolved it in a total volume of 100ml
  • Of this 100ml I used 20gm. (Containing 2gm acid)
  • Add water to 500ml

Now I have a very accurate solution of 2 gm Acid in 500 gm water which is the same as 4 gm/L.

The pH of this solution was 2.8.

Then I threw away 100ml and added tap water to 500 ml. This solution contains 4/5 of the original 1 gm Acid. (1,6 gm in 500 ml = 1.6 gm/l) The pH of this solution is 2,9.

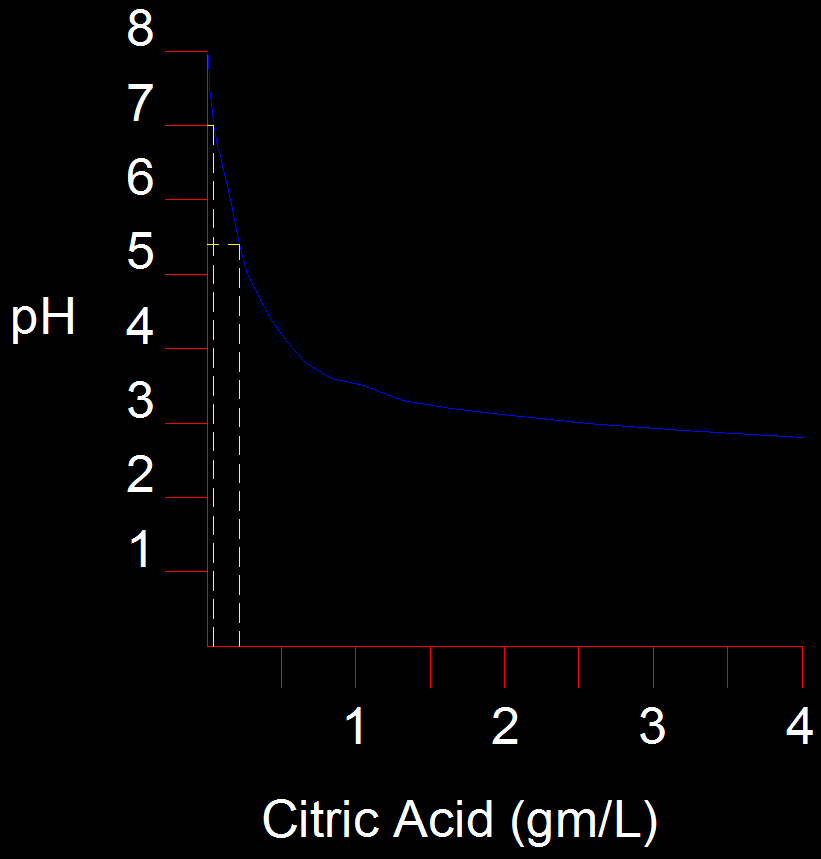
I repeated this until the pH was 8,0 which happened with 0,00618 gm/l citric acid.

Here is the graph that I made from all these measurements. There are a few conclusions:

  • You only need very little acid to make the pH drop from 8 to 7. (0,0462 gm per liter actually)
  • To reach a pH of 5,4 coming from pH 8 you need 0,220 gm per liter.
  • If the pH is low, you need much more acid to decrease the pH even further.

So in conclusion; if you use around 0,2 gm citric acid per liter water the pH is about right for making beer.

Hans

Posted in Bira, Şarap | Yorumlar Kapalı